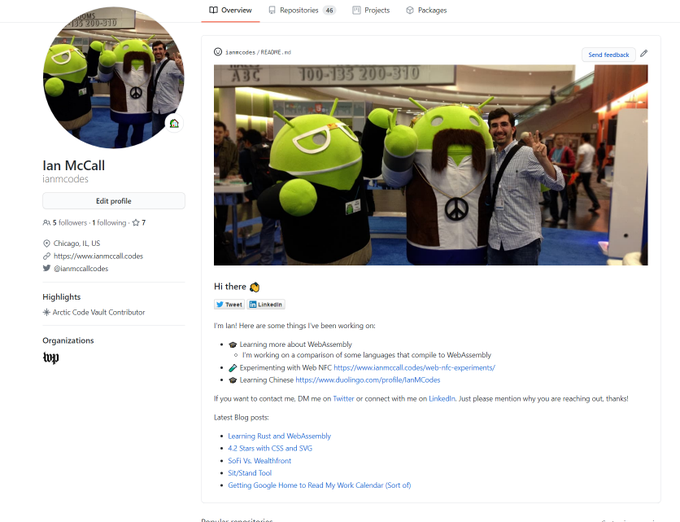
Recently I jumped on the GitHub profile README bandwagon and created my own. And like many others, I added some automation to it and now I need to blog about it.
If you don’t already know, you can create a profile README by creating a ✨special✨ repo that is the same as your GitHub user name. GitHub will helpfully tell you that it is a ✨special✨ repo and that you should choose to initialize it with a README. And that’s it, you can add just about whatever markdown or HTML you want to the README file. And you should see it rendered at the top of you GitHub profile.
Once I got my profile README setup I decided I wanted to keep it updated with the latest posts from my blog (like this one 😁). I also decided that this was something I could automate using GitHub actions, since my blog is built using Jekyll and hosted on GitHub pages.
The first thing I needed was a way to get a list of posts on my site. Fortunately GitHub Pages supports the jekyll-feed plugin 👍. So I just needed to add jekyll-feed to the plugin list and that was step one done ✔.
Next, I needed some script that could fetch my blog’s feed and generate the README.md file. I decided to write it for NodeJS because that is what I’m most familiar with and I wanted to get this done fast. The script pulls in a Handlebars template (README_template.md) and fetches the feed from my site. Then it parses the feed and adds passes the entries to the template to render the final README.md. I added a Handlebars helper so I control how many entries got rendered from the template.
Now I needed a way to trigger my script. This is where GitHub actions come in. I created a workflow that could be run manually (“workflow_dispatch”) or from a “repository_dispatch”. The “repository_dispatch” trigger allows you to use the GitHub API to trigger a workflow. The work flow goes through 5 steps.
- Checkout repo
- Setup Node.js env
- NPM install
- Build
- Commit and Push
Steps 1-3 should be self explanatory. The “Build” step runs the script I created. The last step will commit and push if there are any changes. This just uses the regular shell commands, so there’s nothing really special about it.
git config user.name "README-bot"
git config user.email "[email protected]"
git add -A
git commit -m "README auto updated" || exit 0
git push
The last thing I need is a way to trigger the rebuild action when my GitHub pages rebuilds. Fortunately, GitHub provides the “page_build” action trigger for just this sort of situation. So on the repo for my blog I have a workflow which can run manually or on “page_build”. All the workflow does is execute the one command below.
curl -XPOST -H "Authorization: token $" -H "Accept: application/vnd.github.everest-preview+json" -H "Content-Type: application/json" https://api.github.com/repos/ianmcodes/ianmcodes/dispatches --data '{"event_type": "build_application"}'
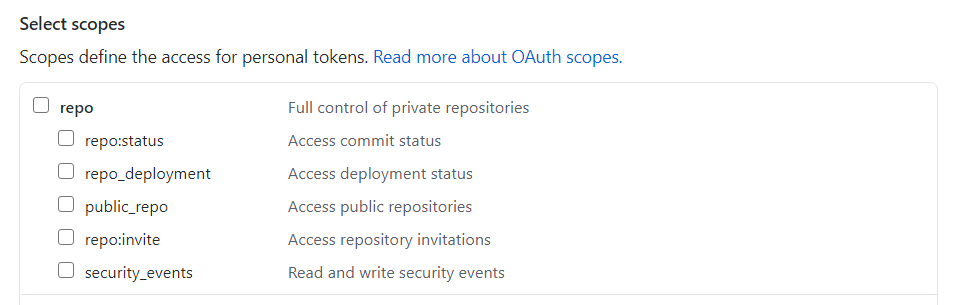
All this does is use curl to send a POST to “dispatches” on my profile repo. One important thing to note is the secrets.USER_TOKEN. In order to use repository_dispatch you need a token with “repo” authorization, so I needed to create a user token with that permission. In GitHub you can create personal access tokens. In this case I need a personal access token with the “repo” scope, so make sure to check that box.
Then copy the token and create the secret on the blog repo.
And that’s it! Now every time I create a new blog post (like this one) my profile README is automatically updated!